
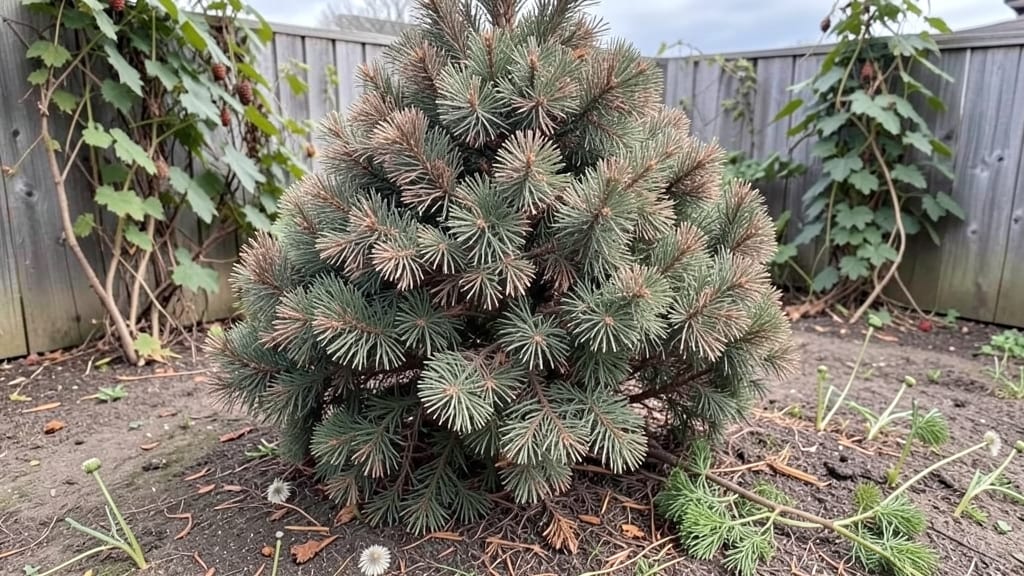
Arborvitae Shrubs Turning Brown: Revive With This 3-Step Fix

Shrubs

Arborvitae Shrubs Turning Brown: Revive With This 3-Step Fix

My arborvitae shrubs turning brown nearly made me give up on them last winter—until I discovered the three key fixes that brought them back to life. 🌿 The good news? Most browning isn’t permanent, and the solutions are simpler than you’d think, whether it’s dehydration, pests, or winter burn.

First, rule out the obvious: watering too little or too much can stress roots and turn needles brittle. Check the soil—it should feel like a damp sponge, not dry sand or soggy mud.

Then look closer: spider mites leave fine webbing, bagworms create fuzzy nests, and fungal spots appear as dark patches. I caught all three on my plants last year.

With the right mix of pruning, targeted treatments, and seasonal adjustments, you’ll see fresh green growth within weeks. The key is acting fast—once browning spreads past the tips, recovery gets trickier. I’ll walk you through exactly what to trim, when to spray, and how to protect them next winter.

Even if your shrubs look beyond saving now, these steps will keep new growth vibrant and prevent future damage. The best part? Most fixes take less than an hour and cost almost nothing. Let’s get those evergreens looking lush again.

Root Causes Of Browning

When your arborvitae shrubs start turning brown, it’s rarely a sign of a single issue—it’s usually a mix of environmental stress, pest attacks, or poor care. Understanding the why behind the browning is the first step to saving your shrubs.

Below, we break down the most common culprits, from weather woes to hidden pests, with clear explanations so you can diagnose the problem like a pro.

Arborvitae shrubs thrive in USDA Hardiness Zones 3–7, but they’re sensitive to sudden temperature swings. When exposed to:

  • Frost or freeze damage: Young, tender growth is especially vulnerable when temperatures drop below 20°F (-7°C). Ice crystals form in the cells, rupturing them and causing browning, often starting at the tips of branches.
  • Heat or drought stress: High temperatures (above 90°F / 32°C) combined with dry soil can scorch foliage. The edges of leaves turn brown and crispy as the plant struggles to retain moisture.
  • Winter desiccation: In winter, dry winds can physically dry out the needles, even if the soil is moist. This is why arborvitae often brown in exposed, windy locations.

How to spot it: Browning starts at the tips or edges of branches, often on one side of the shrub (the windward side). The rest of the foliage may still look green.

Arborvitae need consistent moisture but hate soggy roots or drought. Here’s how water issues cause browning:

Problem Signs Why It Happens
Underwatering Brown, dry needles that crunch when touched; tips curl upward. Without enough water, cells lose turgor pressure, and the shrub goes into survival mode, shedding moisture from the edges of leaves first.
Overwatering Yellowing or brown lower branches; mushy stems; foul-smelling soil. Poor drainage leads to root rot (from Phytophthora or Pythium fungi). Roots suffocate, starving the shrub of nutrients, and browning spreads upward.
Improper watering Brown patches on one side of the shrub. Surface watering (like sprinklers) wets foliage but not roots, leading to sunburn or fungal growth.

Pro tip: 🌡️ Water deeply 1–2 times per week (depending on climate) and mulch 2–3 inches to retain moisture. If your soil is clay-heavy, amend it with compost to improve drainage.

Arborvitae are partial-shade lovers, but too much direct sun—especially after transplanting—can fry them. Here’s how:

  • Sudden full-sun exposure: If moved from shade to sun, leaves get sunburned, turning brown and papery. This is common with newly planted shrubs.
  • Reflective surfaces: Light-colored walls, driveways, or pavement can intensify UV rays, causing browning on the side facing the reflection.
  • Winter sun + wind: In cold climates, bright winter sun on snow-covered ground can bounce harmful UV rays onto the shrub, leading to desiccation.

How to spot it: Browning appears on one side of the shrub (the sun-exposed side) or on young, tender growth.

Arborvitae are a buffet for pests and fungi. Here’s what’s likely munching on your shrubs:

🐛 Bagworms 🐛

What they do: These caterpillar-like pests spin silk bags on branches and devour needles, leaving behind brown, skeletonized foliage. Heavy infestations can kill branches entirely.

How to spot them: Look for 1-inch brown bags hanging from branches in late summer. Shake a branch over a white sheet—if you see tiny worms, it’s a bagworm party.

🍄 Fungal infections (cytospora, phytophthora)

What they do: Fungi like Cytospora canker cause oozing, sunken lesions on branches, which turn brown and die back. Phytophthora root rot (from overwatering) leads to yellowing, then brown foliage starting at the bottom.

How to spot them: Check for:

  • ✅ Dark, tar-like ooze on branch cracks (Cytospora).
  • ✅ Mushy, discolored roots (Phytophthora).
  • ✅ Brown needles that fall easily.

🐜 Spider mites & scale insects

What they do: These tiny sap-suckers drain nutrients from leaves, causing bronzing or brown speckling. Heavy infestations lead to premature needle drop.

How to spot them: Inspect the undersides of leaves for:

  • ✅ Fine webbing (spider mites).
  • ✅ White, waxy bumps (scale insects).

Pro tip: 🔥 For pests, blast off bagworms with a hose (they’re tough but vulnerable when wet). For fungi, prune infected branches 6+ inches below the damage and sterilize tools with 70% rubbing alcohol.

Arborvitae prefer well-draining, slightly acidic soil (pH 6.0–7.0). If the soil is off, your shrubs struggle to absorb nutrients, leading to browning. Common issues:

<

Reviving Your Arborvitae’s Green Glory

If your arborvitae shrubs are turning brown, don’t panic—most issues are fixable with the right care! Below, we’ve mapped out practical solutions tailored to the most common causes, from environmental stress to pests, plus prevention tips to keep your shrubs lush and healthy.

Let’s get those branches back to vibrant green!

Problem: Soggy soil or compacted roots can suffocate arborvitae, causing browning (especially in winter).

How to Fix It: 🔥 Step 1: Check the Soil – Stick your finger 2–3 inches deep. If it’s damp, hold off on watering. 🍳 Step 2: Improve Drainage – Amend heavy clay soil with compost or sand (50/50 mix) to loosen it. For container-grown shrubs, ensure pots have drainage holes. 👨‍🍳 Step 3: Water Deeply but Less Often – Arborvitae prefer 1–1.5 inches of water per week (including rain). Water at the base, not the foliage, to prevent fungal issues. 🥘 Step 4: Elevate if Needed – If planted in a low spot, mound soil around the base to encourage runoff.

💡 Prevention Tip: Mulch with 3–4 inches of wood chips (keep it 6 inches away from the trunk) to retain moisture without smothering roots.

Problem: Brown, crispy tips or patches often mean sun scald (sudden winter thaw + cold snaps) or summer drought stress.

How to Fix It: 🔥 Step 1: Prune Damaged Tips – Use clean, sharp shears to trim back dead branches to healthy green growth (but avoid over-pruning—never remove more than 25% at once). 🍳 Step 2: Provide Winter Cover – For young or newly planted shrubs, wrap the base with burlap or use burlap screens to block harsh winds. 👨‍🍳 Step 3: Adjust Watering in Summer – Deep water every 7–10 days during dry spells (morning is best to reduce evaporation). 🥘 Step 4: Choose the Right Spot – If your arborvitae is in full sun, opt for Thuja occidentalis ‘Smaragd’ (more sun-tolerant) or provide afternoon shade.

🌡️ Prevention Tip: Apply a 2–3 inch layer of mulch in late fall to insulate roots. For extreme winters, use anti-desiccant spray (like Wilt-Pruf) in late fall to lock in moisture.

Problem: Chewing insects (bagworms) or sucking pests (spider mites) can turn foliage brown and brittle.

How to Fix It: 🔥 Step 1: Inspect for Pests – Look for:

  • Bagworms: Small, brownish bags hanging from branches.
  • Spider Mites: Tiny webs on undersides of leaves + stippled browning.

🍳 Step 2: Manual Removal (Bagworms) – Pluck bags into a soapy water bucket (1 tbsp dish soap per gallon). Repeat weekly until gone. 👨‍🍳 Step 3: Spray for Mites – Mix 1 tsp neem oil + 1 tsp insecticidal soap per quart of water, then spray both sides of leaves (early morning or evening). 🥘 Step 4: Introduce Beneficial Insects – Release ladybugs or lacewings (available at garden centers) to prey on mites naturally.

✨ Prevention Tip: Prune shrubs in early spring to remove overwintering pests. For severe infestations, use Bt (Bacillus thuringiensis)—a microbial pesticide safe for pets and wildlife.

Problem: Coastal areas or exposed sites can cause salt burn (from road spray) or wind desiccation, leading to browning.

How to Fix It: 🔥 Step 1: Flush the Soil – Water deeply to rinse away salt buildup, then mulch to prevent future accumulation. 🍳 Step 2: Create a Windbreak – Plant a hedge (like boxwood or juniper) on the windward side or install a temporary fence for young shrubs. 👨‍🍳 Step 3: Fertilize Gently – Apply a slow-release, balanced fertilizer (10-10-10) in early spring to rebuild vigor. 🥘 Step 4: Avoid Over-Salting – If using de-icing salt near your shrubs, sweep it away and water thoroughly afterward.

🎯 Prevention Tip: Choose salt-tolerant varieties like Thuja occidentalis ‘Emerald Green’ if you’re in a high-salt area.

Problem: Yellowing (then browning) foliage can signal nitrogen or iron deficiency, common in poor or alkaline soils.

How to Fix It: 🔥 Step 1: Test Your Soil – A $20 soil test kit (from garden centers) reveals pH and nutrient levels. 🍳 Step 2: Amend Acidic Soils – If pH is above 7.0, mix in peat moss or sulfur to lower it (arborvitae prefer 6.0–7.0). 👨‍🍳 Step 3: Fertilize Smartly –

  • For nitrogen: Use composted manure or a slow-release granular fertilizer (like Osmocote).
  • For iron: Apply chelated iron supplement (follow package rates).

🥘 Step 4: Water After Fertilizing – Ensures nutrients reach the roots.

💪 Prevention Tip: Top-dress with 2–3 inches of compost annually in early spring to maintain soil health.

Pro Tip: If browning persists after 4–6 weeks, consider root rot (from chronic overwatering). In this case, dig up the shrub, trim blackened roots, and replant in well-draining soil with a mycorrhizal fungus to aid recovery.

Frequently asked questions

1

Why are my arborvitae turning brown only on one side?

This is usually a sign of environmental stress like sun scald or windburn. The exposed side (often west or north) gets more direct sunlight or wind, causing dehydration. Check for reflective surfaces (like pavement) that may intensify UV rays. Try providing afternoon shade or installing a windbreak for protection.

2

Can I save my arborvitae if half the branches are already brown?

Yes! Prune back the dead or severely damaged branches to healthy green growth, but never remove more than 25% at once. Focus on the tips where browning starts. For underlying issues (like pests or disease), treat the root cause first. New growth should emerge from the base within 4–6 weeks if conditions improve.

3

Is it too late to fix my arborvitae if it’s brown all over?

Not necessarily! If the roots are still healthy (check by gently scraping soil away—white roots mean life!), you can revive it. Trim all brown branches, adjust watering, and apply a balanced fertilizer. For severe cases, consider replanting in a better location with improved soil drainage. Young shrubs recover faster than mature ones.

4

How do I tell if my arborvitae is dying from pests or disease?

Pests like bagworms leave brown silk bags on branches, while spider mites cause stippled browning with webbing. Fungal issues (like Cytospora canker) show as oozing lesions on branches. Inspect the undersides of leaves and branch cracks—if you see tiny creatures or dark spots, that’s your culprit. Treat accordingly with sprays or pruning.

5

Should I water my arborvitae every day to prevent browning?

No! Overwatering causes root rot, which is just as deadly as underwatering. Water deeply 1–2 times per week (depending on climate) and check soil moisture—it should feel like a damp sponge, not soggy. Mulch with 2–3 inches of wood chips to retain moisture without smothering roots. Adjust based on rainfall.

★★★★★5.0(6 reviews)
Categories Shrubs
Deficiency/Nutrient Issue Signs Fix It With
Iron chlorosis (too alkaline soil) Yellow new growth with brown leaf edges. Apply chelated iron or sulfur to lower pH.